DIM Implementation
This guide will show a brief overview of spinning up your first DIM
Ok, so you know what a DIM is, how do you get started?
Steps
The basic steps are as follows:
- Register at https://developer.spinwheel.io to get your secret key here and use that to get a DIM token
- Include the initialization script
- Call the Spinwheel.create method providing your required options
Follow along with the video here or use the steps documented below.
Here's a breakdown:
1. Get a valid token
When you got your Spinwheel credentials, you should've received a SecretKey which will act as your passkey to all our products. (If you haven't gotten that yet head over to https://developer.spinwheel.io/admin) Whenever you call a Spinwheel API, you'll pass that SecretKey as a bearer token in an auth header like this:
{
	"Authorization": "bearer 8ae8d6fa-df8d-4c5d-9f9b-c4e4c10968b0"
}
☝️ Not a real secretKey, for all you clever hackers out there...
To access any of our Drop-In Modules, you'll make an API call to retrieve a DIM Token.
A note on DIM tokens
DIM Tokens are single-use JWT tokens, which means as soon as you call a DIM you'll need to get a new DIM Token if you want to call another module.
Until you decide to "put a ring 💍 on it" and move to production with us, you'll be using our sandbox environment. The base URL for the sandbox is https://sandbox-api.spinwheel.io.
Last but not least, DIMs are specific to one of your individual users, so when you make the call for a token, you need to tell us which user you want it for by specifying extUserId or userId.
| Parameter | Description |
|---|---|
| extUserId | A unique Id that you use to identify a user in your application. The value is a string, so you can use an email, uuid, or whatever else is convenient. |
| userId | A Spinwheel UserId that is returned to you when a user logs in using the Connect or Identity Connect DIM. |
Now that you understand the basics of a DIM token, here's a cURL snippet to help you access your first token:
curl --location --request POST 'https://sandbox-api.spinwheel.io/v1/dim/token' \
--header 'Authorization: Bearer 8ae8d6fa-df8d-4c5d-9f9b-c4e4c10968b0' \
--header 'Content-Type: application/json' \
--data-raw '{
  "extUserId": "158a3456-5eda-429c-8759-b20f9493d841"
}'
Warning!
Since your SecretKey should remain... you know, secret 🥸, any API calls to Spinwheel should be server-to-server. Just to be clear! If you try to run it in a frontend you'll get a CORS error.
2. Include the initialize script
Include the Spinwheel DIM initialize script on your page. It should always be loaded directly from https://cdn.spinwheel.io, rather than included in a bundle or hosted yourself. When the script is loaded you can invoke the create method with a configuration object.
<script src="https://cdn.spinwheel.io/dropin/v1/dim-initialize.js"></script>
3. Call the create method
When you use the Spinwheel.create function, you need to provide a configuration object as the only argument. This function will return an object that includes two functions: "open" and "exit". The "open" function will display the drop-in module, while the "exit" function will close it. The configuration object must include a unique element ID, which is where the drop-in module will be displayed, as well as a valid token provided by the Spinwheel API.
For example:
const handler = Spinwheel.create({
  containerId: 'DROPIN_CONTAINER_ELEMENT_ID',
  onSuccess: (metadata) => {},
  onLoad: () => {},
  onExit: (metadata) => {},
  onEvent: (metadata) => {},
  onError: (metadata) => {},
  onResize: (metadata) => {},
  dropinConfig: {
    'module': 'debt-connect', // Change this if you'd like to use a different module
    'token': '{token}'
  }
});


handler.open() // to render dropin module
handler.exit() // to close dropin module
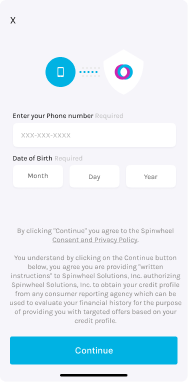
🎉 Congrats! 🎉 You should now be able to use the DIM on your page. If you did everything correctly, you should see something like this (depending on which DIM you're rendering it might look slightly different):

Callbacks
Assuming you're using identity-connect, once your user makes it through the security questions, we'll invoke the onSuccess callback with the event name AUTH_SUCCESS in the metadata object. This is confirmation that your user has been successfully authenticated.
onSuccess(metadata) {
	console.log(metadata);
  /*
  	{
      eventName: "AUTH_SUCCESS",
      message: "User authentication is successful",
      ...
    }
  */
}
From there, you should go and call the /v1/users endpoint using your extUserId to get the userId for the now authenticated user.
Visit the DIM API page for more details on the various callbacks.
Code sample
We're hoping that was easy to follow but if you'd rather something out of the box, we have a demo identity-connect page coded up for you here. All it requires is you adding your own token in the config object.
<html>
  <head>
    <title>SpinWheel Drop in Module</title>
  </head>
  <body>
    <noscript>You need to enable JavaScript to run this app.</noscript>

    <div id="spinwheel-identity-connect"></div>

    <script src="https://cdn.spinwheel.io/dropin/v1/dim-initialize.js"></script>

    <script type="text/javascript">
      const config = {
        containerId: 'spinwheel-identity-connect',
        env: 'sandbox',
        onSuccess: (metadata) => {
          console.log('onSuccess', metadata);
        },
        onLoad: (metadata) => {
          console.log('onLoad', metadata);
        },
        onEvent: (metadata) => {
          console.log('onEvent', metadata);
        },
        dropinConfig: {
          module: 'identity-connect',
          token: '<YOUR-TOKEN-HERE>',
        },
      };

      const handler = window.Spinwheel && window.Spinwheel.create(config);
      handler.open();

    </script>
  </body>
</html>
For a complete list of the available DIMs, please view this table.
To learn more about our debt APIs and 1-click solutions, visit spinwheel.io.
Updated about 1 month ago
